


This is part two in a three part series about how to do cross-domain tracking with Google Analytics when using Google Tag Manager for tag deployment.
The first part can be found here: cross-domain tracking with Google Tag Manager – Part 1: Links
Update:
The third part can be found here: cross-domain tracking with Google Tag Manager – Part 3: Iframes
To recap:
There are three ways to cross from one domain to another domain
- A link that goes from domainA to domainB. Example code:
<a href="http://www.domainB.com">link going to domain B</a> - A form on domainA sends its data to domainB. Example code:
<form action="http://www.domainB.com"> - An iframe on domainA that loads contents from domainB. Example code:
<iframe src="http://www.domainB.com" />
All of these ways must be tracked to ensure consistent information. Our previous blog post went through how to set up cross-domain tracking for links. So now we will have a look at how to track cross-domain forms. Iframes will be handled in a future blog post. See here for cross-domain tracking of iframes
Prerequisite: Enable the linker in Google Analytics. If you have not done so already you need to allow the linker in Google Analytics – otherwise Google Analytics will not read the supplied cross-domain tracking information on the other domain. For instructions please check the previous blog post about cross-domain tracking.
Tracking cross-domain forms with Google Tag Manager
To track forms across domains the tracking information needs to be added to the destination url of the form when the form is submitted. The destination url of a form is the url in the action attribute of the form.
Example:
<form action="http://www.domainB.com">
Therefore the destination url of the form is often called the form action. The action of adding the tracking information to the form action is sometimes called decorate form.
For Classic Analytics the approach for tracking forms cross-domain is pretty similar to tracking links cross-domain with GTM. However, the auto-linking feature of Universal Analytics does not work for forms, so the approach below should be used for both Classic and Universal analytics.
Three actions are necessary:
- Detect whether a form is being submitted
- Check whether the action of the form goes to a domain that should be tracked cross-domain.
- If the form goes cross-domain then decorate the action of the form with the cross-domain information.
Step 1:
Create a tag that automatically detects form submissions. To do that create a new tag of tag type Event Listener > Form Submit Listener and trigger that tag on all pages. If there is already such tag active in your account, then you do not need to create a new one.
Note: Optionally you could trigger that tag only on the pages that contain a cross-domain form. But then you need to check and change the rules each time the website changes, so it is usually easier to just trigger that tag on all pages. The impact on the website caused by this tag is pretty much negligible, so there is no harm in triggering it everywhere.
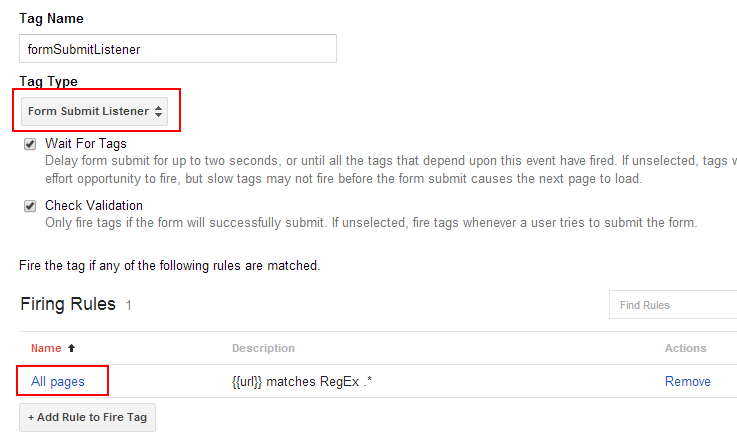
Note: The two options of this tag do not seem to matter for cross-domain tracking. In my tests the form actions were decorated not matter whether the options were enabled or not.
Step 2:
Create a rule that triggers only if a form was submitted and the destination url of the form goes to the cross-domain. Note that usually you want to have cross-domain tracking from domainA to domainB and from domainB to domainA. So two rules are necessary.
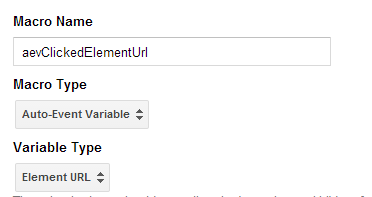
First create a macro that reads the form action of the submitted form:
Macro name: aevClickedElementUrl
Macro type: Auto event variable
Variable type: Element url
Notes: This macro is exactly the same macro as for clicked links (which is why I have not changed the name). If you have already such a macro then you do not need to do anything here.
The name of the macro can be whatever you want. I prefer to prefix the macro names with the source (here auto-event variable = aev), but this is of course not required.
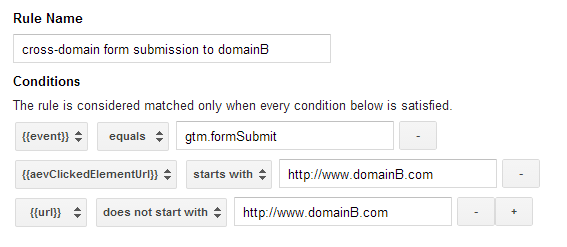
Then create a rule named cross-domain form submission to domainB with these three conditions:
{{event}} equals gtm.formSubmit
AND
{{aevClickedElementUrl}} starts with http://www.domainB.com
AND
{{url}} does not start with http://www.domainB.com
The first part tells GTM that a form was submitted. The second condition tells GTM to only take action if the form is sent to domainB. The last condition ensures that GTM does not decorate the form if we are already on domainB. Thanks to this condition we can use the same GTM container on both domainA and domainB without having to adjust the rules somehow.
And the rule for domainA cross-domain form submission to domainA :
{{event}} equals gtm.formSubmit
AND
{{aevClickedElementUrl}} starts with http://www.domainA.com
AND
{{url}} does not start with http://www.domainA.com
Note: If more domains are involved in the cross-domain tracking then simply add such a rule for each involved domain.
Step 3:
Now create a Google Analytics tag with the tracking type Decorate form and trigger this tag for all the the rules defined in step 3.

Step 4:
As usual: Preview and test the new features. Open the preview version in GTM and submit a form that goes cross-domain. Once the destination page on the other domain has loaded check the url – you should see the cross-domain parameters in there.
If everything is working fine then create a new version and publish it via GTM.
Decorating forms manually
The event handler loaded by the form click listener is attached to the document node. So if there is an other event handler on the form itself that stops the propagation of the submit event, then GTM will never see that a form was submitted. In this case you need to decorate the form manually.
A basic example of a form where the propagation of the submit event is stopped (by the return false):
<form action="http://www.domainB.com" onsubmit="return false;">...</form>
Such forms can be decorated manually, but this is quite complex and depends on what exactly is done with the form data. For the general idea check how to manually decorate links in the previous blog post.
The next blog post will deal with iframes which is quite a bit more tricky than links and forms…
